Simple Saturday

A Simple Saturday Craft for You - Merry Christmas Bows

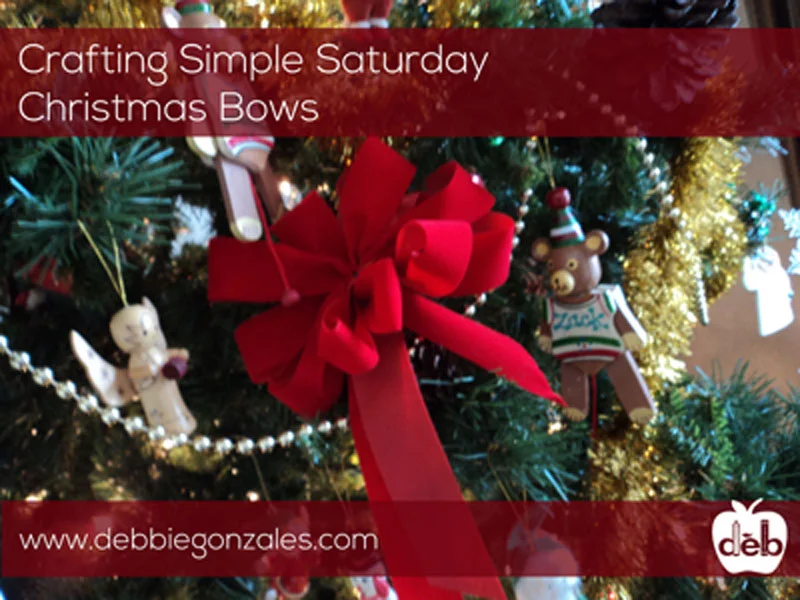
I thought it might be fun to resurface an old Simple Saturday craft project blog post - one that was originally posted FIVE YEARS AGO! Isn't that crazy? I hope you enjoy this little blast from the past. Gather up scissors, ribbon, and a piece of florist wire and I'll show you how how crafting a Christmas bow is done!

~     ~     ~     ~     ~     ~     ~

Simple Saturday - Dec. 17, 2010

You know you want one of these gorgeous bows nestled in the branches of your Christmas tree. After I show you how super-simple it is to make these loopy lovelies, you'll want to make a million of them!

Lean in and let me tell you a secret. It took me less than 5 minutes to make that ribbony treasure. With a little bit of practice, you'll be in the Simple Saturday Super Merry Christmas Bow making business in no time. Come on! Let's get started!

DSC00339.JPG

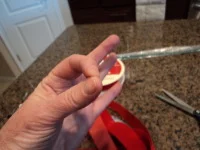
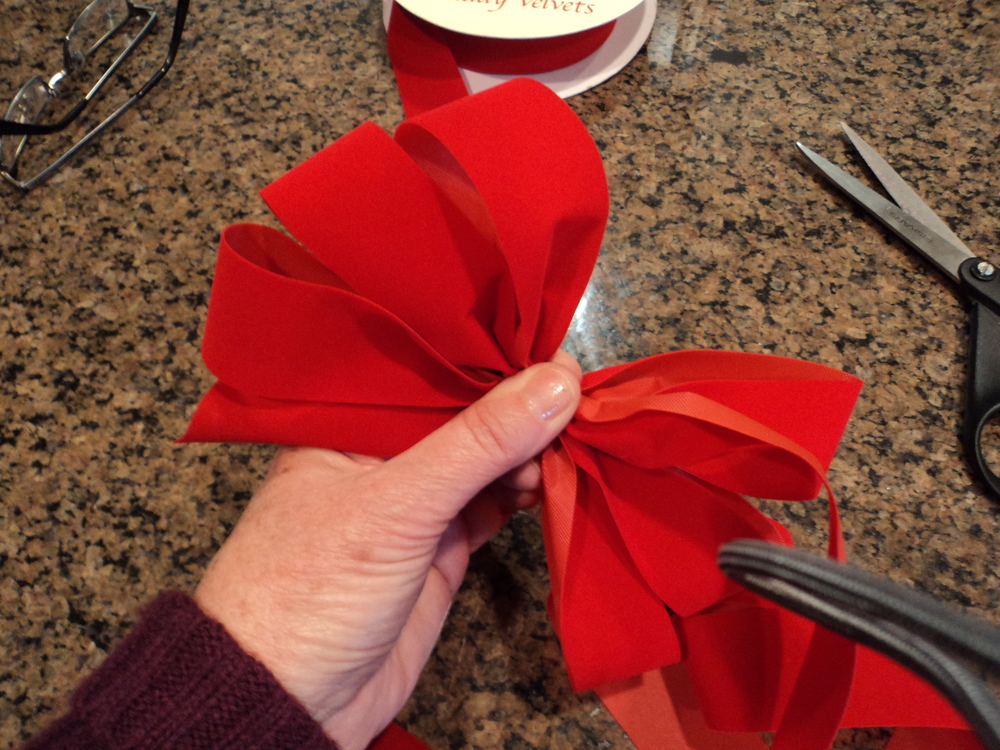
 With our 1 3/4 inch wide ribbon, light gauged florist wire and scissors in hand we're ready to bring on the bow-ness. The only real challenge to making a holiday bow is to be certain that you've got a firm pinch going on. Powerful pinching pressure is the key to beautiful bow creating.

DSC00340.JPG

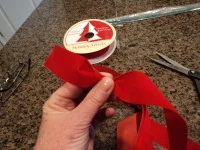
To begin, cut a piece of ribbon about 2 1/2 feet long. Make that first pinch about 4 inches from one end of the ribbon. Now fold the long end of the ribbon back forming a loop about the same size as the ribbon strip to the left. PINCH! Bring it back and around on the left. Make a loop and PINCH! Repeat this procedure three times making 6 lovely loops.

DSC00345.JPG

Let's add a little depth to this pretty puppy by making a couple of loops on top of the three we've previously made. What's the magic word? You've got it. PINCH!

To make a streamer, make a long loop at the base of your bow. For the finishing touch, make loop the ribbon over your thumb to create a nice center focal point and PINCH like you've never pinched before.

DSC00354.JPG

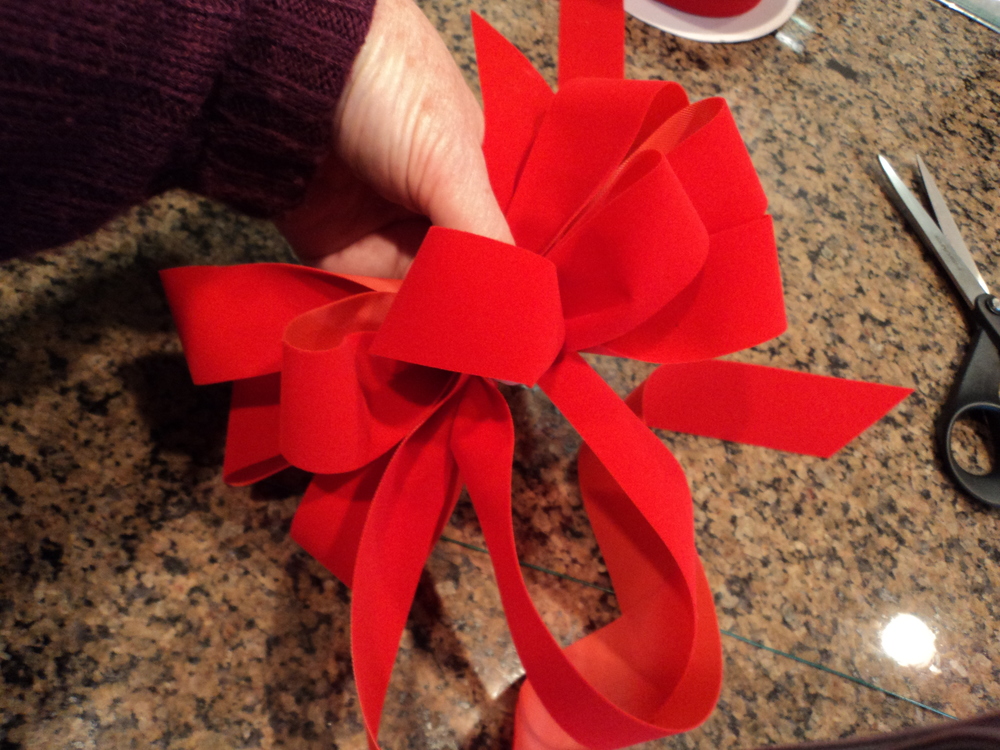
At the back of the bow, lay the florist wire on top of your thumb and carefully gather the hoops together. Don't quit pinching until all of the loops have been securely gathered by the wire. Twist the wire tightly.

Cut the long loop at the bow base to form a streamer. Wiggle waggle the loops around, fluffing them up to create the rich fullness every holiday bow deserves. Attach your Super Merry Christmas Bow to a tree or a wreath...anywhere for that matter...with the florist wire. You know what to do with that wire, don't you? PINCH!

ss2sm.jpg

 I'd like to end this post in deep gratitude for the bounty beneath my Christmas tree, for the blessings of friendship, and a sincere wish that you have the happiest holiday EVER!

Merry Christmas!

Your Mommy Was Just Like You - A Celebration of the Spirit of Mother's Day

I began making guides for folks before the Common Core was cool. Even then, I was creating hands-on, project-based content that is entertaining, yet academically sound - the kind of stuff that both the kids and the folks that care for them would appreciate, and have been enjoying every minute of doing so for a long, long time.

Recently, author Kelly Bennett asked if I would go back and align all of the guides I previously made for her with the Common Core State Standards. I was glad for this opportunity as I would be able to revisit the work I had done almost three years ago in the light of present-day standards. That's kind of exciting, in a nerdy sort of way.

Kelly's Your Mommy was Just like You is just as charming as I remember it being. I love the way it celebrates humanity, in all it's messy forms. In it, tales of a mother's childhood are told to a child. The grown up is presented as an awkward, fantasy-loving, mistake-making kid. This book brings the "nobody's perfect, everybody has an off day" message home, loud and clear.

I encourage you to read this delightful book. Review the guide, too, if you'd like. There are a couple activities in there that will make your Saturday simply delightful, on being creating a Daisy Chain, as demonstrated in the video below.

SWEET DREAMS, WILD ANIMALS: A STORY OF SLEEP by Eileen Meyers

Below is a video showing how to make a Hibernating Bear Craft which is part of a CCSS-Aligned Discussion & Activity guide created for Eileen Meyer’s SWEET DREAMS, WILD ANIMALS: A STORY OF SLEEP.  The book guide can be downloaded at the author’s website at www.eileenmeyerbooks.com or right here!!!!

Synopsis: Fourteen animals, including the cuddly koala, the hairy anteater, and the wise owl, are featured in this lyrical bedtime story about the unusual ways that animals sleep. Natural history notes explain how each animal sleeps, from the magnificent frigate bird, which naps while flying hundreds of feet above the sea, to the walrus, which sleeps with its tusks anchored in floating ice. Whimsical watercolors of dozing animals will help any weary child fall to sleep with a smile.

Book Title: SWEET DREAMS, WILD ANIMALS: A STORY OF SLEEP

Written by: Eileen Meyer

Website: www.eileenmeyerbooks.com   

Illustrated by: Laurie Caple

Website: www.lauriecaple.com      

Published by: Mountain Press Publishing Company

ISBN: 978-0670012855


A Celebration of Color - My Cold Plum Lemon Pie Bluesy Mood (a re-posting)

Cold Plum Book Jacket.jpg

This will be my second Michigan autumn. The vivid colors of the changing leaves, brilliant sunsets, and the rosy-red cheeked children continue to make me smile. Everyday is a celebration of change and color. So, this week, I'd like to focus on a guide I made for Tameka Fryer Brown's charming my cold plum lemon pie bluesy mood. The story explores the connection of the change of mood and its corresponding color. This book is a tribute to sibling rival survival and the tenacity it takes to do so.

 Folks, let me say that the story is lively, entertaining, and very clever. However, if you take a close look at the connection of theme and art, there is a whole lot of shaking going on. It's deep. Really deep. That being said, the guide consists of discussion questions, writing prompts, and basic color theory lessons that lead the reader to an intimate awareness of how color affects and/or reflects emotions.

Purple orange and green water.jpg

One of the most rudimentary-yet-satisfactory activities presented in the guide is Color Mixing. In it, the child experiences the joy of transposing primary colors into secondary and tertiary just by the drip of an eye dropper. It's a very simple activity that lends itself to some profound results.

I encourage you, on this blustery autumn weekend, to take a look at this guide. Better yet, check outmy cold plum lemon pie bluesy mood, the book that inspired the lessons within.

How to Make a Constellation in 3 Easy Steps (An activity inspired by The Great Good Summer)

One of the many intriguing plot threads in this incredible novel is a metaphorical juxtaposition of protagonist Ivy Green's longing to be with her absent mother and the mythological story behind the constellations of Ursa Major and Ursa Minor. Y'all, that is just one of the literary gems laced and layered in the storyline. Seriously, I cannot recommend that you read this novel more highly. It's truly one of the finest that I've read - EVER! Mark my words...we have a Newbery contender here.

In the Educator's Guide, you will find a super easy, step-by-step constellation creation project. If you can gather up some black construction paper, tape, and a thumb tack you, my friends, can create a little corner of the galaxy to enjoy for days and to day to come. Just watch the video below and see what I mean!


Book Title: The Great Good Summer

Author: Liz Garton Scanlon

ISBN: 9781481411479

Synopsis: Ivy Green's mama has gone off with a charismatic preacher called Hallelujah Dave to The Great Good Bible Church of Panhandle Florida. At least that's where Ivy and her dad "think" Mama is. But since the church has no website or phone number and Mama left no forwarding address, Ivy's not entirely sure. She "does "know she's missing Mama. And she's starting to get just a little worried about her, too.

Paul Dobbs, one of Ivy's schoolmates, is also having a crummy summer. Paul has always wanted to be an astronaut, and now that NASA's space shuttle program has been scrapped, it looks like his dream will never get off the ground.

Although Ivy and Paul are an unlikely pair, it turns out they are the perfect allies for a runaway road trip to Florida--to look for Mama, to kiss the Space Shuttle good-bye, and maybe, "just maybe," regain their faith in the things in life that are most important.

Educator's Guide Overview: This in-depth guide consists of discussion questions, a study of the scientific method, writing exercises, a study of point-of-view, a thematic study, a lesson involving the creation and observation of a paper airplane,  and the creation of a constellation.

CLICK HERE FOR A FREE DOWNLOADABLE COPY.

How to Make a Robotic Hand in 10 Easy Steps

Simple Saturday has returned - new and improved!

Check out this video inspired by Kersten Hamilton's most awesome Gadgets and Gears series. The robotic hand activity featured in the video below is part of the guide created for her newest book in the series, Ire of Iron Claw,  which will hit the market in July.  In the meantime, start reading the book that started all the buzz, The Mesmer Menace. While you're at it, check out the cool educator's guide that was created to compliment that book!

Y'all, this series is PERFECT for the bright child who owns a love of language, suspense, drama, and science! Just thinking about it makes me want to do a little hand jive!

The Ultimate Simple Saturday Project

My son shared this inspirational video from Karmatube.com with me. I have to do the same with you. It's a great story about a community's supportive effort to help make a boy's vision of splendor become a reality. In it, a boy named Caine uses every ounce of his imagination and fortitude to create a true-to-life arcade, complete with a fun pass! The video's great. You have to watch.

Caine's story reminds me of when I directed summer art workshops at a lovely Montessori school in Dallas years ago. Weeks before the program began we'd ask parents to donate supplies such as egg cartons, empty cereal boxes, paper towel rolls, milk and jugs and the like. Folks brought in mounds of the stuff. And, man, I wish you could have seen how good-ol kid ingenuity mixed with a little tape and a touch of tempera transformed the cardboard mountain into unicorns, castles, buses, and cars. Good times...No, those times were the best.

I recall the magical feeling in the air as the kids collaborated on their creative projects. Shouts of "I have an idea!" "Yes!" "Try this!" buzzed around the room. Hours passed like seconds. Together we made fond memories I will cherish for a lifetime. I hope the kids, now grown, remember those days in the same way I do.

Thanks, Caine and Karmatube.com, for my stroll down memory lane. 

Keep up the good work!

The sky's the limit for both of you.

A Simple Saturday Harmonica

One of the things that I love when working with author and dear friend Kelly Bennett is that she gets me. She knows that I am all about fostering a sense of creativity and whimsy through the use of simple, everyday things. And, both Kelly and her terrific new book, One Day I Went Rambling, celebrates the Simple Saturday spirit. It's a great story. Trust me. Zane, Kelly's protagonist, personifies the intention of this website right down to the tips of his untied tennis shoes. Rock on, Zane. Rock on!

So, today for your Simple Saturday, One Day I Went Rambling, homemade band musical pleasure, let's make a harmonica. (I confess, the construction process is going to be shamefully easy. Oh, well. What else is new, right?)

All you need to gather up is a comb and a piece of tissue paper (Or, in my case, tear off 3 squares of toilet paper.). We're sure not breaking the bank with this one, are we? 

Then, to make a Simple Saturday harmonica, fold the tissue/toilet paper over the teeth of the comb. That's it, my friend. Truly. That's it.

To play your Simple Saturday harmonica, gently lay your lips on the paper-covered comb teeth and hum. The vibrating resonations of the paper between the teeth with both tickle your lips and delight your ears. It's a really cool experience. I promise. 

If you are not satisfied with the sound your comb harmonica is making, you're trying too hard. Loosen your lips and hum lightly. There you go. Good job.

Heck, while you're at it,  maybe you can learn how to play the Beatbox Comb Harmonica, a variation of Yuri Lane's rocking theme. Isn't this guy amazing?

You know, I'll bet Zane would find a way to play a beatbox comb harmonica.

And I'll bet you can, too.

A Shoebox Guitar

I have to say that when Kelly Bennett asked me to make a guide for her newest picture book One Day I Went Rambling, I was stoked! This book celebrates the unbridled creativity of a free-thinking child like no other book I've ever read does...which totally speaks to the true Simple Saturday spirit that resides within me.

Without giving too much of the story away, the protagonist sees the world in a marvelous, creative way as demonstrated when, in his eyes, an old women's slips become sails, a weather wooden crate becomes a pirate ship, and a pop top becomes treasured jewels. The kid is cool. There's no getting around it.

In one of the final scenes, the protagonist leads a rag-tag band of neighborhood kids in a parade, of sorts. To illustrate the final scene and the theme of this darling book, when Kelly contracted me, she stated that she wanted me to orchestrate a homemade band. Truly music to my ears!!!! Rock on.

So, in celebration of Kelly's latest picture book success, let's begin with the string section. Let's make a Simple Saturday shoe box guitar! It's so, so simple to do. All you need to make this accoustic wonder is a handful of rubber bands, a shoe box and some scissors - for real!

Simply cut a sound hole (Thanks, Wikipedia) out of lid of the box. Then, lengthwise, stretch the rubber bands over the sound hole. Now close the box and you're in the music business, baby!

 Pretty slick, huh?

Through the course of the guide I created homemade instruments to fill the brass, percussion, string, and the woodwind sections of the orchestra. Plenty of symphonic Simple Saturday fodder for a long time, my dear friends. Plenty.